
Quick Summary: Experiencing issues with your TV backlight LED strip? This guide offers essential tips to help you troubleshoot and fix common problems, ensuring your ambient lighting looks great. Learn how to identify problems, make simple repairs, and enhance your viewing experience like a pro!
Hey there, home theater fans! Bob E Riley here from Aimguider. Ever get that magical feeling when your TV lights up the wall behind it with vibrant colors? It really makes movies and games pop! But sometimes, those LED strips can be a little… temperamental. Does a section of your vibrant backlight suddenly go dark? Is a color not quite right, or does the strip flicker unexpectedly? Don’t sweat it! These snags are more common than you might think, and often, a simple fix is within reach. We’re going to walk through everything you need to know to get your TV backlight looking its best again, without needing a degree in electronics. Stick around, and we’ll have that ambiance restored in no time!
Understanding Your TV Backlight LED Strip

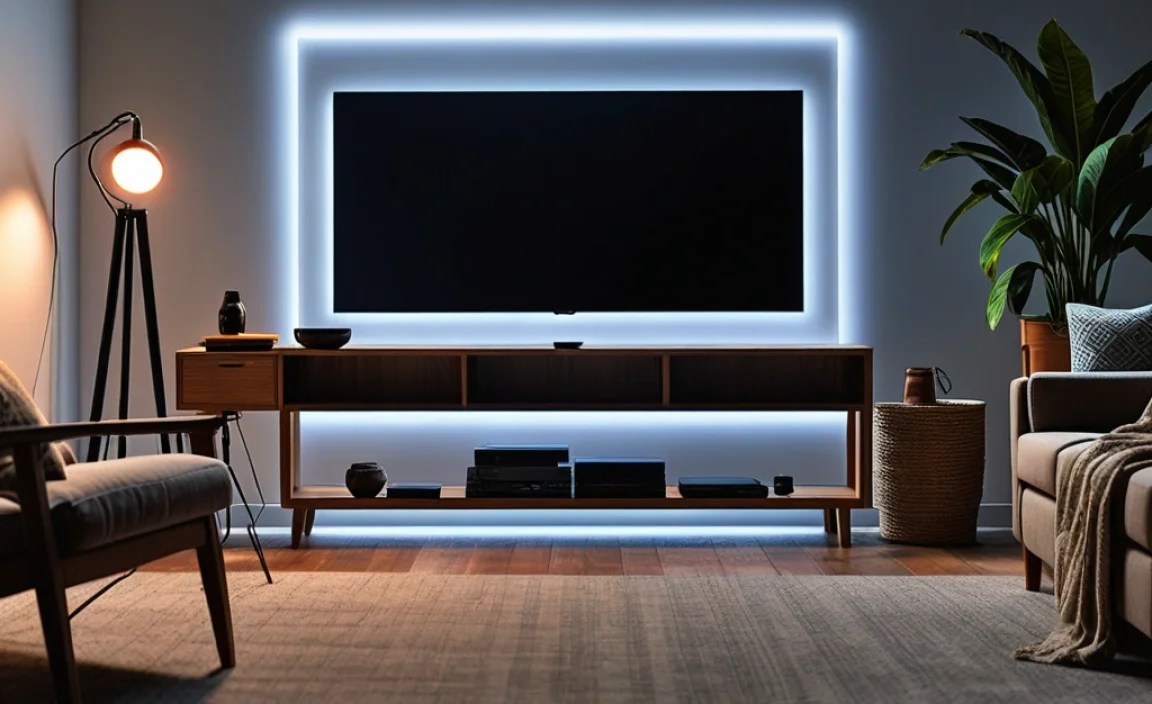
Before we dive into fixing things, let’s quickly understand what we’re dealing with. TV backlight LED strips, often called bias lighting or ambient lighting, are flexible strips lined with tiny light-emitting diodes (LEDs). When you install them behind your TV, they cast a soft glow onto the wall. This isn’t just for looks; it can actually reduce eye strain by minimizing the contrast between the bright TV screen and a dark room. Plus, it creates a more immersive viewing experience, making your screen seem larger.
These strips typically come in kits that include the LED strip itself, a power adapter, a controller (which might be a small box or integrated into the power cord), and sometimes a remote. For RGB or RGBW strips, the controller is crucial for managing the colors. The adhesive backing helps them stick to the TV, and the flexible nature allows them to be shaped around corners.
Most modern LED strips are low-voltage (usually 12V or 24V), making them relatively safe to handle. However, like any electronic device, they can encounter issues. Understanding the basic components will help us pinpoint the problem when something goes wrong.
Common TV Backlight LED Strip Problems
Let’s talk about the most frequent headaches people encounter with their TV LED strips. Knowing what to look for is the first step to a successful fix!
1. Flickering Lights
This is a classic. One minute your lights are steady, the next they’re doing a disco act you didn’t ask for. Flickering can be caused by a few things:
- A loose connection somewhere in the strip or at the power source.
- A failing power adapter or controller.
- Issues with the power outlet itself.
- Sometimes, software settings on newer smart TVs can cause interference.
2. Dim or Dead Sections
Is a part of your strip stubbornly refusing to light up, or is the whole thing dim?
- A break in the LED strip itself (sometimes the tiny wires inside).
- A bad connection between segments of the strip (if you have a multi-part strip).
- Insufficient power from the adapter.
- The controller might be faulty and not sending enough power to all sections.
3. Incorrect Colors or Color Variations
This is frustrating, especially if you’re aiming for a specific mood. Maybe your “blue” looks purple, or one end of the strip is a different color than the other.
- A faulty LED on the strip.
- Issues with the controller’s ability to mix colors correctly.
- Damaged wiring that’s affecting color signals.
- If your strip has multiple color components (like RGBW), one of the color diodes might have failed.
4. Strip Not Turning On At All
The worst-case scenario – nothing happens. This usually points to a power issue.
- The power adapter is not plugged in or is faulty.
- The power outlet isn’t working.
- The connector to the strip is loose or damaged.
- The controller unit is dead.
- The LED strip itself has a complete break.
5. Remote Control Not Working
You press buttons, but nothing changes. This could be simple:
- The remote’s battery is dead.
- The remote’s IR (infrared) sensor is blocked or faulty.
- The receiver on the controller unit is faulty.
- You’re too far away or there’s an obstruction.
Essential Tools for Troubleshooting and Fixes
You don’t need a professional workshop to fix your LED strip. Here are some basic tools that will make the job much easier:
- Screwdriver Set: Often needed to access power adapters or sometimes the TV itself if you’re mounting the strip.
- Pliers (Needle-nose recommended): Useful for gripping small connectors or wires.
- Wire Strippers/Cutters: If you need to repair a damaged wire or re-crimp a connector (use with caution!).
- Small Flathead Screwdriver or Spudger: Great for gently prying open plastic components or disconnecting fragile connectors.
- Multimeter (Optional but Recommended): This is the go-to tool for testing voltage, continuity, and diagnosing electrical issues. It’s overkill for simple fixes but invaluable for complex ones. You can find decent beginner models for under $30.
- Electrical Tape or Heat Shrink Tubing: For insulating any exposed wires after a repair.
- Cleaning Cloth and Isopropyl Alcohol: For cleaning connections and the TV surface before re-applying adhesive.
Step-by-Step TV Backlight LED Strip Fix Guide
Let’s get down to business! We’ll go through a logical process to diagnose and fix your LED strip issues. It’s always best to start with the simplest causes and work your way up.
Step 1: Check the Power Supply and Connections
This is where most problems start. A loose plug or a dead adapter can cause all sorts of grief.
- Verify Power Outlet: Plug a different, known-working device (like a lamp or phone charger) into the same outlet. If that device doesn’t work, the problem is your outlet, not the LED strip.
- Check Power Adapter Connections: Ensure the power adapter is firmly plugged into the wall outlet and into the controller or directly into the LED strip (depending on your model). Sometimes, the connector can wiggle loose.
- Inspect the Power Cord: Look for any visible damage, kinks, or cuts on the power cord for the adapter. If you see any, do not use it and consider replacing the adapter.
- Test the Adapter (If Possible): If you have a multimeter, you can test the output voltage of the adapter. Look for the voltage rating (e.g., 12V) printed on the adapter. Set your multimeter to DC voltage, touch the probes to the adapter’s output connector, and check if it matches the rating. If it’s significantly lower or zero, the adapter is likely bad. For more on using a multimeter safely, check out resources from institutions like Energy.gov on lighting basics, which touches upon power considerations.
Step 2: Inspect the LED Strip and Connectors
Now, let’s look at the strip itself and how it connects.
- Visually Inspect the Strip: Carefully examine the entire length of the LED strip. Look for any obvious signs of damage:
- Burn marks
- Cut or torn sections
- Loose or detached solder points (where wires connect to the LEDs)
- Damaged LED modules
- Check All Connectors: If your strip is in multiple pieces, or if it connects to an extension wire or controller with a clip-on connector, ensure these are securely fastened. Sometimes, these clips can slip off or not make good contact. Gently push them together.
- Examine Wire Integrity: If there are any exposed wires, especially at the connection points, they can cause shorts or intermittent power.
Step 3: Troubleshoot the Controller
The controller is the “brain” of your LED setup. If this unit is faulty, it can cause all sorts of issues.
- Unplug and Replug: Sometimes, a simple power cycle can reset the controller. Unplug the power adapter from the wall, wait 30 seconds, and plug it back in.
- Test Different Modes/Colors: If your controller has buttons or a remote, try cycling through different colors and modes. Does the problem persist across all settings? If only one color is affected, it points to an LED/wiring issue. If all lights are affected, it leans more towards power or controller failure.
- Check for Overheating: Feel the controller box (if it has one). Is it excessively hot to the touch? This could indicate it’s failing or being overworked due to a short circuit elsewhere.
Step 4: Address Remote Control Issues
If your remote is the problem, it’s usually an easy fix.
- Replace Batteries: This is the most common culprit. Open the remote and install fresh batteries.
- Check for Obstructions: Ensure the IR receiver on the controller unit isn’t blocked by anything. Also, make sure there’s a clear line of sight between the remote and the receiver.
- Clean the Remote Sensor: Sometimes, dust or grime can interfere with the remote’s signal. Wipe down the remote’s emitter and the controller’s receiver with a dry cloth.
- Test Range: Try moving closer to the controller to see if the remote starts working.
Step 5: Minor Repairs (If Comfortable)
If you’ve identified a specific issue like a loose wire or a damaged connector, and you’re comfortable with minor electrical work, you might be able to fix it. Always unplug everything before attempting repairs!
Scenario A: Loose Wire at Connector
If a wire has come loose from a crimp connector:
- Gently strip about 1/4 inch of insulation from the wire end if needed.
- Carefully reinsert the wire into the correct terminal of the connector.
- Use pliers to gently re-crimp the connector onto the wire.
- If the connector is beyond repair, you might need to purchase a replacement connector and electrical tape or heat shrink tubing.
Scenario B: Damaged Section of Strip (Requires Cutting and Soldering/New Connector)
LED strips often have designated cut points. If a section is broken:
- Cut at Designated Mark: Only cut at the copper pads marked for cutting.
- Clean Connection Points: Ensure the copper pads on both the remaining strip and any new connector or second strip are clean.
- Use a Soldering Iron (Advanced): For a robust connection, solder wires from a new connector or second strip to the copper pads. This requires skill and the right equipment.
- Use a Solderless Connector (Easier): These small clips are designed to slide over the copper pads and clamp down, making a connection without soldering. Ensure you get the correct type for your strip width (e.g., 10mm for standard RGB strips). For guidance on these, visual aids from hardware stores often demonstrate their use.
- Insulate: Whichever method you use, ensure the connections are properly insulated with electrical tape or heat shrink tubing to prevent shorts.
Important Note: If you’re not comfortable with soldering or working with small electrical components, it might be safer and more cost-effective in the long run to replace the entire LED strip. Safety first!
Step 6: Cleaning and Re-Adhering
If your strip has fallen off:
- Clean the Surface: Peel the old adhesive off the TV and the strip. Use isopropyl alcohol and a clean cloth to thoroughly clean the area on the TV where the strip will be re-applied. This removes any dust, grease, or residue, ensuring good adhesion.
- Apply New Adhesive (If Necessary): Most LED strips come with pre-applied adhesive. If it’s lost its stickiness, you can buy double-sided mounting tape specifically designed for electronics or automotive use.
- Carefully Reapply: Start from one end and press the strip firmly onto the clean surface, working your way along. Press down for several seconds in each section.
When to Consider Replacement
Sometimes, despite your best efforts, an LED strip is beyond repair. Here are signs it might be time to buy a new one:
- Extensive Damage: If the strip is physically ripped in multiple places, has significant burn marks, or many dead LEDs, replacement is the most practical option.
- Constant Flickering/Malfunctions: If you’ve checked all connections and power, and the strip still behaves erratically, the internal components might be failing.
- Controller Failure: If the controller unit is visibly damaged or consistently fails to power the strip correctly after thorough troubleshooting, replacing the entire kit is often easier than finding an exact replacement controller.
- Outdated Technology: Newer LED strips offer better color control, brightness, and smart features. If your current strip is several years old, an upgrade might offer a significant improvement.
Choosing a New TV Backlight LED Strip
If it’s time for a new strip, consider these features:
Types of LED Strips
Here’s a quick rundown of common types:
| Type | Description | Best For |
|---|---|---|
| RGB | Red, Green, and Blue diodes that mix to create millions of colors. | General mood lighting, dynamic effects. |
| RGBW | Includes RGB diodes plus a dedicated White (W) diode for purer white tones and brighter whites. | More accurate white light, better color matching, vibrant hues. Highly recommended for TV bias lighting. |
| Addressable/Dreamcolor LEDs | Each LED can be controlled individually, allowing for chasing, rainbow, and complex animation effects. | Highly customizable, animated lighting effects. Can be more complex to set up. |
Key Features to Look For:
- Length: Measure the back of your TV (usually the perimeter) to determine the length you need. It’s often better to get slightly more than less.
- Adhesive Quality: Look for strips with strong, reliable adhesive, often 3M branded, for secure mounting.
- Power Supply: Ensure the adapter provides sufficient wattage for the length of the strip. Too little power leads to dimming, especially at the end of long runs.
- Control Method: Do you prefer a remote control, a smartphone app, or voice control integration (like with Alexa or Google Assistant)?
- Color Accuracy: For bias lighting, RGBW strips are generally superior for achieving a good white balance and vibrant colors that won’t overly tint your screen.
- Easy Installation: Look for kits with simple connectors and clear instructions.
When selecting a new strip, consider brands known for quality and good customer support. Reputable manufacturers often provide better warranties and clearer specifications, ensuring you get a product that performs well and lasts.
Frequently Asked Questions (FAQ)
Q1: My TV’s USB port doesn’t power my LED strip. Why?
A1: TV USB ports often don’t provide enough stable power (amperage) for LED strips, especially longer ones or those that draw more current. They are usually intended for lower-power devices like flash drives. It’s best to use the dedicated power adapter that came with your LED strip kit.
Q2: Can I cut my LED strip to fit my TV?
A2: Yes, most LED strips have designated “cut marks” (usually indicated by a scissor icon or copper pads). Only cut at these marks. If you cut anywhere else, you will likely damage the strip and render that section or the whole strip useless.
Q3: My LED strip is flickering after a few weeks. What should I do?
A3: First, check all connections – power adapter to controller, controller to strip, and any extension cables. Ensure they are secure. If the problem persists, the power adapter or the controller itself might be failing. Test the power adapter’s output if you have a multimeter.