Are you not satisfied with your normal speaker? Do you want more bass? Then you have to work a little harder. And you will need some items and the help of the “Hsu Research” driver.
Then you will be able to create an interesting sub at a low cost. So you can make a Sonotube subwoofer with your simple tools.
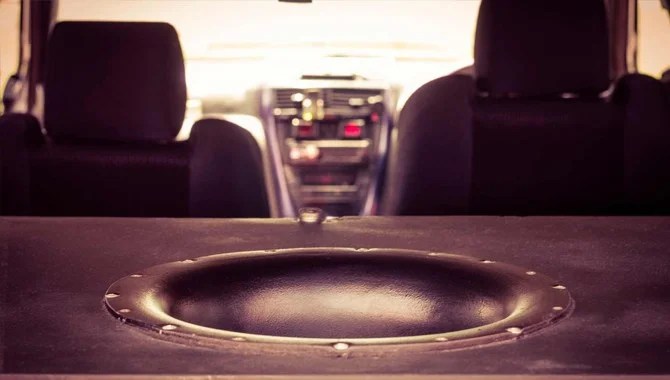
A subwoofer is an important part of home theatre. A subwoofer is used to make a movie more realistic as it adds a visual effect to the movie. So, how to build a Sonotube subwoofer? A subwoofer can add a touch of emotion to add mood and excitement to a good movie. A subwoofer must be able to ventilate. Then the effect of the subwoofer will be more.
A subwoofer will need its strong output to work properly, which will be in the 20-25Hz frequency range without any distortion.
How To Build A Sonotube Subwoofer?
- To make a Sonutube, I used a cardboard tube with a height of 23 “and a bass of 24”. (You can find this in any construction material store)
- If the tube square is sharp, then you can size it well with a sharp saber slay blade.
- Then apply a coating of wax-feeling polymer inside the tube item.
- Spray the inside of the tube with Autobody Undercoating to help reduce imitation.
- Since the stick-on velcro will work here, you must cover the inside of the tube with tape before spraying the auto body undercoating.
- This makes the edge of the tube more smooth and rounds the diameter of the tube, which makes it convenient to insert the caps.
The Planning Stage
The first step in building a sonotube subwoofer is planning. You need to know your woofer’s dimensions and determine the tube size you will need. It would be best if you also chose a suitable enclosure and decided on the best way to mount the woofer. The next step is to build the woofer.
Firstly, you should start by measuring and cutting the tube to the correct dimensions. You will also need a mounting bracket, an air core fan, and wire mesh.
Step -01
Step one is to gather all the necessary materials. You will need a sonotube, speaker cones, bolts and washers, an electrician’s tape measure, drill/driver and screwdriver, wire cutters/strippers (optional), sandpaper (~600 grit or higher), and wood glue.
When measuring your sonotube subwoofer enclosure, it is essential to consider the available space and the size of your cone speakers. You will also want to ensure enough room on either side of your woofer to mount the enclosure securely.
If you are using cone speakers, it is also essential to account for their mounting depth and the distance from the front of your speaker to your voice coil.
For optimum performance, you will need at least 2″ of space in front of each cone speaker and between 1 and 2 inches from the voice coil itself.
Step -02
Once you have gathered all your materials, begin preparing your sonotube by cutting off one long end with a saw or knife, then carefully shaving down the OD ( Outside Diameter ) until it measures ~1- 1/2″.
Next, use the drill and driver to create a 3/8″ hole in one end of your sonotube. Use the screwdriver to attach the cone speakers using washers and bolts. Make sure you tighten the bolts evenly, so there is no rattling or vibration from your woofer enclosure.
Once you have attached all of your speakers, it is time to seal off your opening with the electrician’s tape measure, making sure to leave a 1-1/2″ allowance on either side for mounting purposes.
If you are using cone speakers, you will also want to sand the edges of your openings so that they are smooth and rounded.
Step -03
Finally, use the wood glue and a wooden dowel to secure your cone speakers inside your sonotube enclosure. Remove all excess adhesive before finishing off by sanding down any rough spots on the edges of the section.
Congratulations, you have now created your very own woofer enclosure.
Next, install the brackets and secure them with bolts or screws. Finally, insert the fan into one of the ends of the tube and connect it to your power supply.
The Sonosub Program
The Sonosub program provides an excellent and affordable way to build your woofer enclosure! Not only does this method allow you to create an enclosure that is tailored specifically for your speaker, but it also allows you to control the entire assembly process from start to finish.
If you want to create an enclosure tailored for your speaker, then the Sonosub program is a great option.
This method allows you to control the entire assembly process from start to finish and provides an excellent and affordable way.
Additionally, if you are looking for an easy and safe way to attach cone speakers inside your woofer enclosure, using an electrician’s tape measure is a great option.
Doing so will ensure that there is no rattling or vibration from your woofer enclosure – perfect for optimal sound quality.
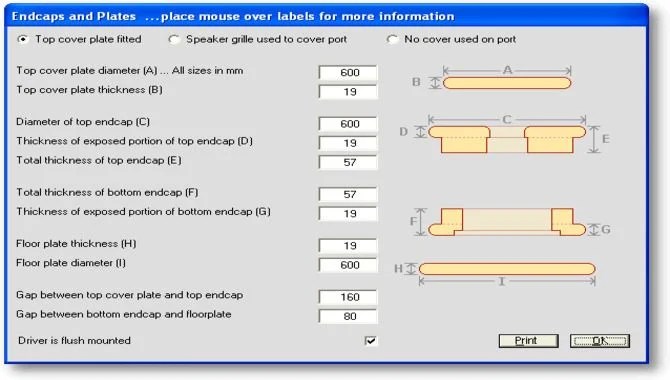
How Do Last Caps Work?

3/4 inch “MDF” will be needed to make the caps. It resonates less than a cardboard tube, but it will produce a lot of dust when it is sized.
Draw in MDF with the help of the campus to fit it in the tube. Then cut to a certain size with a saw. Then take the help of a band saw to cut along the line of the pencil.
Then use a router and a circle jig to cut and smooth the caps.
- You will need two caps on the subwoofer. A single inner cap should be used for the top of the tube. And double-layered inner caps should be placed under the tube.
- The upper cap of the tube should be two inches larger than the diameter of the tube.
- Use standard wood glue and clamps to straighten the end cap of the tube.
- The last cap needs to make holes for the port, driver and binding post/speaker terminal.
- Then laminate it.
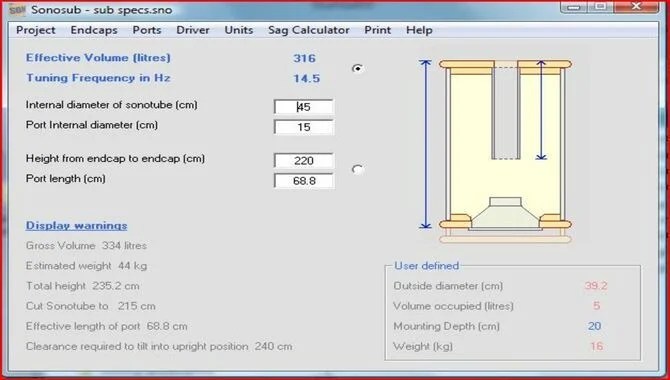
Ports
The length of the port depends on the volume of the enclosure and the tuning frequency. It is very suitable as an alternative to ABS or PVC piping. It comes in different sizes.
You can select the port according to your needs. Although smaller sizes contain ports (6+ and 6-) in diameter. So, when you design your Sonosub, you must choose the perfect one.
Necessary Equipment
You need some tools to make a sonutube.
Sonutube: You will need a Sonutube when making with your subwoofer or speakers. You can find it at local building materials stores or cement stores.
So you need to take your necessary Sonutube. Your Sonutube must be more than 17 “in diameter. Also, with larger tubes, you will get more loud volume.
Sabarsaw: Another essential tool is the saber saw, you must have it. You can buy the right saber saw for you at a cheap price. I would recommend you to choose ‘Autoscroller’ as you will find it at a cheaper price even if it comes with a circle guide.
It also helps to make perfect cuts. You can cut 16″diameter MDF with a saber saw, which will give you a circle. Also, take the help of a circle guide to create a perfect circle.
Router: If your sub has a system for air ventilation, it will weaken the integrity of the design. When you make a Sonutube at home, it will not be around all the time, but it will have a gap. So take the help of the router for the perfect circle on the cap of the speaker.
For this, you can buy a Sear saw which is available at a cheap price, and it comes with a guide to make the perfect circle. It comes with a base plate that allows rounding and trimming.
Compass: A compass is needed to make the end cap for the tube. A perfect circle can be created by compass on MDF or driver.
Some More Essentials:
- Rough papers are very effective for smoothing MDF. It is convenient to put the caps on the Sonotube by perfecting the edges.
- Glue gun is very useful and effective for closing the air circulation.
- You can use wood glue to make bonding the end cap together.
- Use foam tape to fasten the edges of the driver holes and ports.
Conclusion
I hope now you know how to build a Sonotube subwoofer.
As you can see, building a sonotube is not that difficult. All you need to do is put the suitable materials in order and follow the instructions accordingly.
The Sonotube is a fantastic subwoofer with everything you need to get excellent sound quality. However, it does require skills in DIY-ing to set up correctly. I hope we have helped. In no time, you will be enjoying music like never before.
FAQs:
1.What Is A Sonotube?
Ans: A sonotube is a circular tube made from several layers of paper honeycomb with a metal coil in the center. Basically, it creates low-frequency sounds.
2.How Does A Sonotube Work?
Ans: When you play music through a sonotube, the metal coil will cause the vibrations in the paper honeycomb to create low-frequency sound. With the struck sonotube, the metal coil vibrates and produces a low-frequency sound.
3.What Are The Benefits Of Using A Sonotube Subwoofer?
Ans: The benefits of using a sonotube subwoofer are that they create low-frequency sound in a circular shape, which is easier to transport and can be placed anywhere in your home. They also have a long life expectancy, so you won’t need to replace them often.
4.Where Can I Buy A Sonotube Subwoofer?
Ans: You can buy a sonotube subwoofer online or in-store.
5.How Do I Build A Sonotube Subwoofer?
Ans: The steps for building a sonotube subwoofer are simple. You will need to purchase a sonotube, glue it together, and add the metal coil.
6.Is It Necessary To Seal A Sonotube Subwoofer?
Ans: Not always, but we recommend it if you plan to use the subwoofer outdoors. Sealing will prevent moisture and dust from entering the woofer, damaging it over time.
7.What Are The Risks Associated With Building A Sonotube Subwoofer?
Ans: There are a few risks associated with building a sonotube subwoofer. However, if you don’t seal the woofer, moisture and dust will invade it over time and damage it.
8.How Long Will It Take Me To Build My Sonotube Subwoofer?
Ans: The build time for a sonotube subwoofer is typically around 30 minutes.
9.What Should I Do If I Experience Problems Building My Sonotube Subwoofer?
Ans: If you experience issues building your sonotube subwoofer, don’t hesitate to contact the manufacturer for help. They will be able to walk you through the process and provide support along the way.