
When you face “Microphone Not Working After Windows 10 Update”, you can see this article because you can learn about the reasons and solutions of that issue.
In the world, many people use Microphone, and they get different services Such as recording, speaking, etc. Nowadays, people use a Microphone as default to their computer or computer on Windows 10.
When Windows 10 updates, it generates new and improved features but breaks the previous ones. That’s why some issues occur that are responsible for not working the Microphone. If you’re one of the millions of people who have experienced a problem with your microphone not working after you’ve installed the latest Windows 10 update, there are some simple steps you can take to fix the issue.
In this article, we’ll walk you through the steps you need to take to troubleshoot and fix the problem. Windows 10 is a great operating system, but there will always be some kinks that need to be work out.
That’s why keeping your software up-to-date is always essential, mainly if you use a microphone to communicate. Some users have reported that their microphone stopped working after they installed a recent Windows 10 update. If you’re experiencing this issue, here are some tips on how to fix it.
How To Fix Microphone Not Working After Windows 10 Update
Before solving any issue, you should find the causing factor. Many points create a matter of Microphone issue. Some important issues are given below:
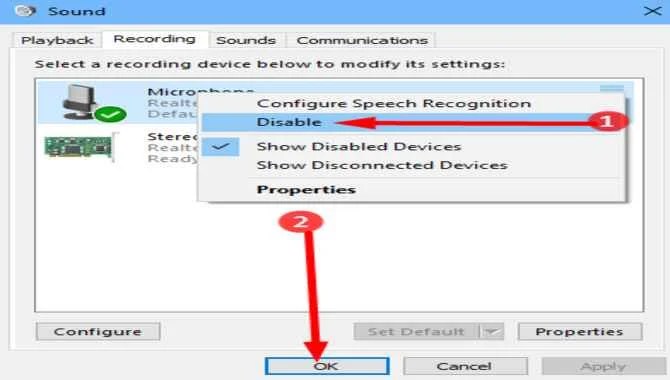
1. Disable Or Mute Off Microphone

If your Microphone is connected well, but it doesn’t work, you will check the internal matter. Such as whether the Microphone is turned off or on, enabled or disabled. To check this, you can follow these steps:
To Enable Or Disable Check:
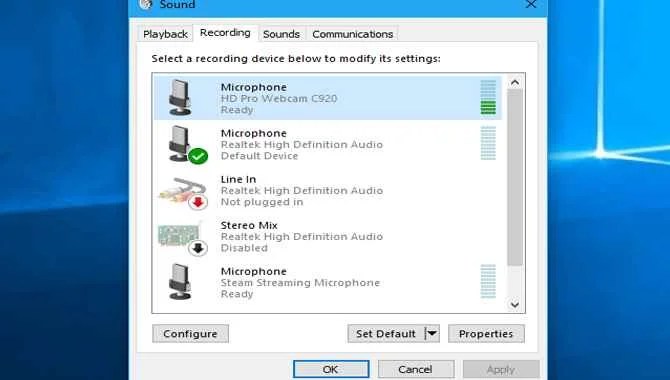
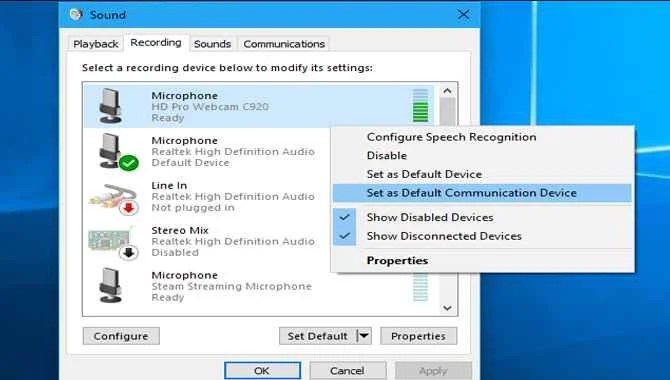
- Go to the Taskbar and press right-click on the Volume icon, and select Sound from the option.
- Now select the Recording option from the header and see whether the Microphone is enabled or disabled.
To Mute On or Off check

- For this, Taskbar > Volume icon > Sound > Properties.
- Now select the Levels option from the header. Then check whether the Microphone is muted on or off.
2. Microphone Driver Not Installed:
Sometimes, for any occurrence, you can lose the Microphone Driver. If you don’t install or it doesn’t find the driver, the Microphone stops working.
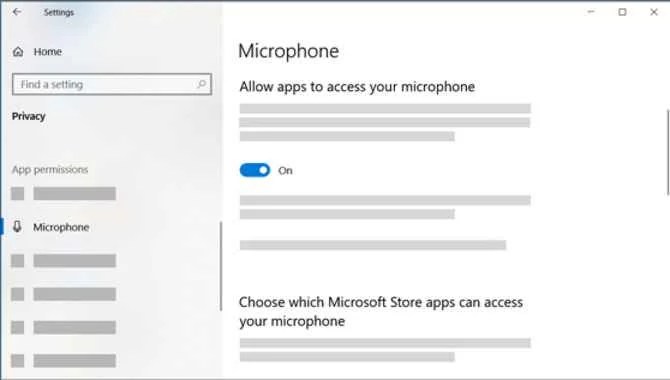
3. Permission Problem:
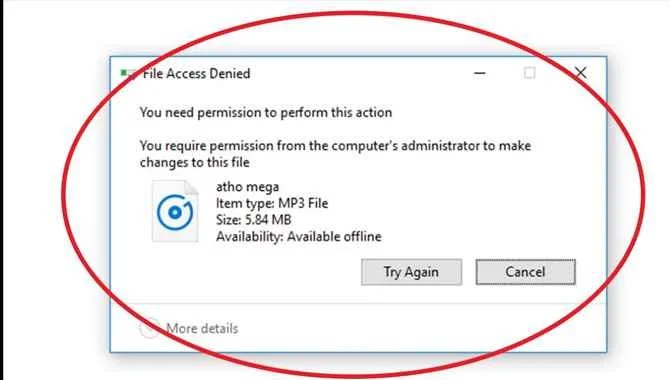
After updating Windows 10, the permission feature may affect and stop allowing access. So you can check Which apps get permission to access it or turn it off. To check the permission problem, you can follow the step:
- Press on the Start Menu and find the Setting option, or you can get it through a shortcut key Windows + I.
- Now go to Privacy and select the Microphone from the left side.
- Then check whether the Allow apps to access your Microphone under Microphone are turned on or off.
Solution Of Microphone After Windows 10 Update
1. Using Troubleshoot
Windows Troubleshoot is an amazing tool used to fix the problem and solve the issues. Troubleshooter procedure:
- Go to the Start Menu and select the Setting
- Press on the Update and Security
- Choose Troubleshoot from the left side.
- Scroll down and select Additional Troubleshooters.
- Press on the Recording Audio under the Find and Fix other problems options.
- Select Troubleshoot option, then choose which part is wanted to check and now select Next.
- After completing Troubleshoot, press on the Close and Exit
2. Enable or Mute On Microphone

You must enable and mute on the Microphone. If the Microphone is enabled and mute on, you can get service from it; otherwise, not.
● To Enable The Microphone:
Taskbar > Volume icon > Sound > Recording > Set Default > OK.
● To Mute On The Microphone:
Taskbar > Volume icon > Sound > Properties > Levels > Mute On
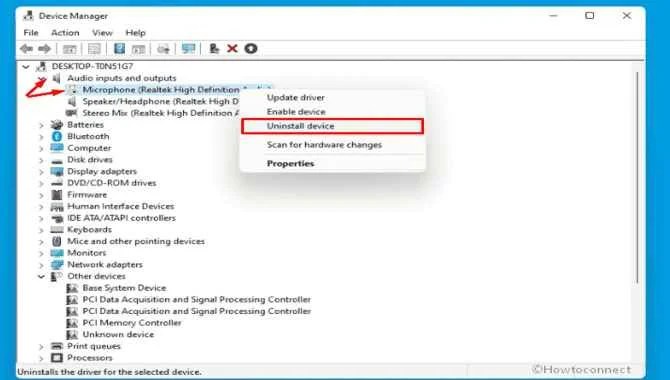
3. Microphone Driver Install
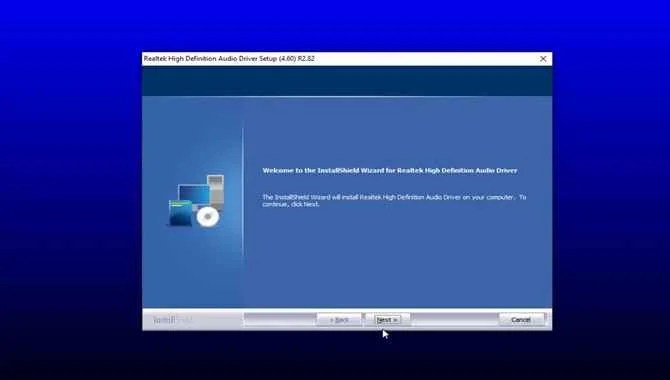
To solve the Microphone issue, you can install or update the Microphone Driver. For this, you can use an internal driver to reinstall it or an external disk.
For this, You can see these steps:
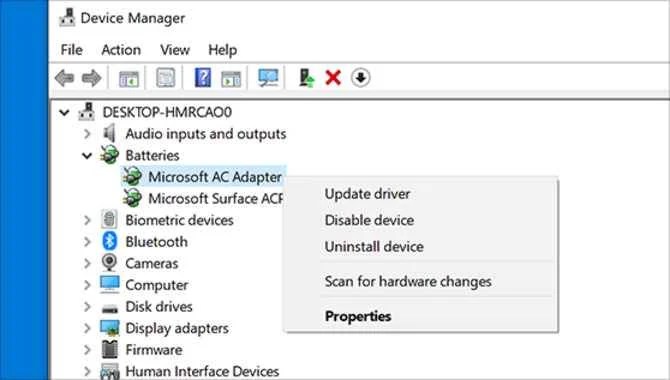
- Go to the Search bar and write Device Manager to find it.
- Click the Device Manager and click on the Audio inputs and outputs.
- Now press the right click on the Microphone ( USB Audio Device ) and choose Update Driver.
- Then automatically close after installation. To complete the steps, you need to Restart the computer or laptop.
4. Permission Turn On

If the Microphone allows access to other software, then it works properly. So it needs to turn on the permission.
- To turn on permission, you can do: Start Menu > Setting > Privacy > Microphone > Allow apps to access your Microphone> Turn On.
5. Appropriately Windows Update
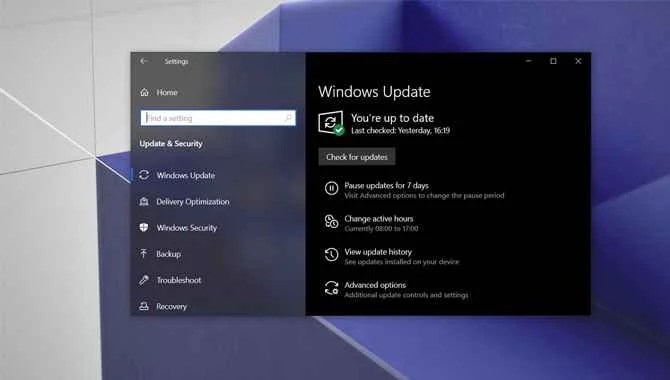
You can update the windows properly and may solve the Microphone issue.
- To update Windows: Start Menu > Setting > Update & Security > Check for Updates.
6. Uninstall Multiple Audio And Printer Device
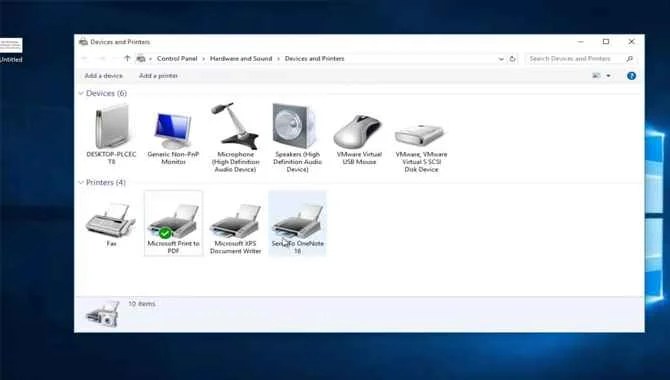
Sometimes, unnecessary apps or tools are installed that hampers the software you want. That’s why it’s a good idea to uninstall multiple Audio and printer devices. And make a device as default and use it carefully.
Make Sure Apps Have Access To The Microphone.
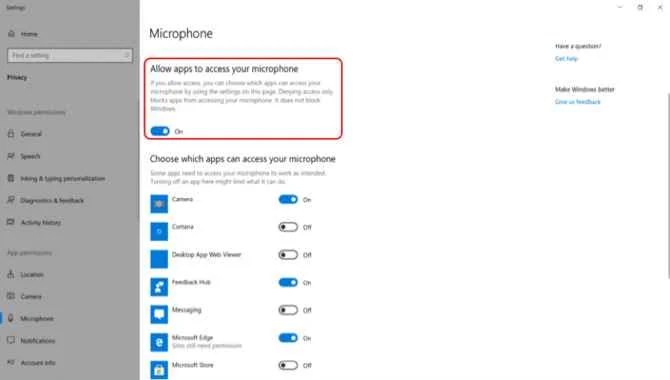
One of the first things you should do if your microphone is not working after the Windows 10 update is to ensure all the apps have access to the microphone. This can be done by going to Settings > Devices > Microphone and turning on “All apps.”
If this does not help, then you can try to uninstall and reinstall the Microsoft Office 365 app. You can also try resetting your microphone by following these steps:
- Open Cortana and type “Reset microphone.”
- Click on “Reset microphone” under “Quick actions.”
- Follow the on-screen instructions.
The Microphone Volume Is Too Low Or Does Not Appear To Be Working.
To fix this, you’ll need to do the following:
- If the volume is too low, you’ll need to increase it by going into “Sound,” clicking on “Recording Devices,” and selecting your microphone from the list.
- If the microphone appears to be not working, then you’ll need to check whether there’s a problem with your audio cable or headset.
Others Cannot Hear Me During Skype Calls.
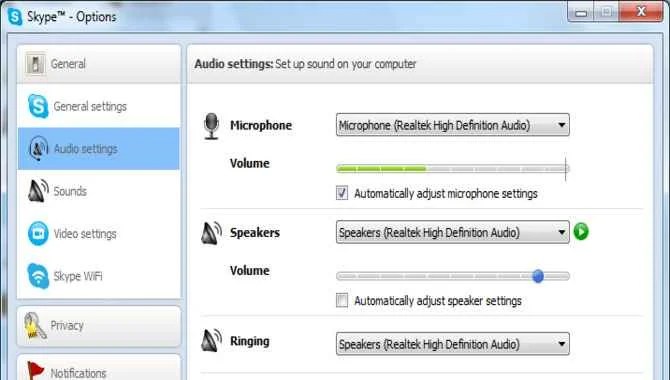
There are a few things that you can do to troubleshoot your microphone not working after the Windows 10 update. The first thing you can try is to restart your computer. This should clear any temporary problems that may be causing the microphone not to work.
You can try using a different headset or mic if that doesn’t work. If none of these solutions work, it might be time to contact Microsoft Support.
How To Fix Mic Not Working After Windows Update On Windows 11/10
There are a few different ways to fix the mic not working after Windows 10 update on Windows 11/10. ” Click “Recording” in the left sidebar and click “Disable built-in microphone.” After that, you can use any compatible external mic.
Another possible solution is to reinstall the audio driver.” Click on the “Installed updates” tab and select the “Driver” category. On the next page, click on “Update Driver Software.” In the next window, choose .
Then, select the folder where your audio driver is located and click on “Next.” Finally, click on “Install.” If neither of these solutions works, then you may need to reformat your hard drive or install a fresh copy of windows 10.
The Microphone Stopped Working After Windows Update.
It’s possible that your microphone stopped working after you installed a recent Windows 10 update. If this is the case, you can do a few things to try and resolve the issue.
First, ensure that you’re using the latest version of the microphone software that came with your pc. You can try reinstalling it if it doesn’t seem to be working.
You could try disabling any background processes using your microphone if that doesn’t work. This can be done by opening an administrative command prompt and typing “MS Config,” hitting enter, and then select the “Processes” tab. Under “microphone,” uncheck the box next to it. If those solutions don’t work, you might need to return to your original install disk and reinstall Windows 10.
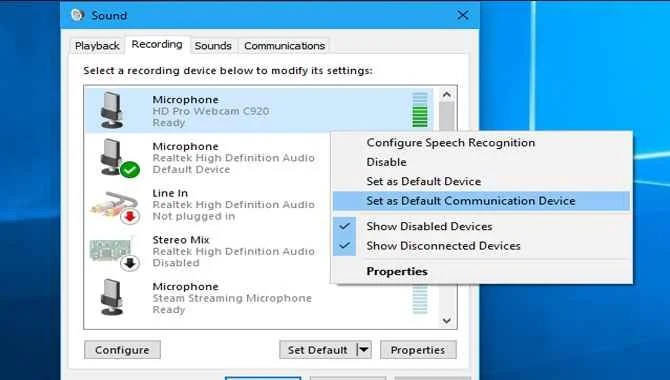
Solution 2: Set The Default Recording Device

After installing a recent Windows 10 update, my microphone stopped working. I tried all the solutions suggested online, but none of them worked.
The first thing you should do is to check if your microphone is working. Under “Recording Devices” (the second item on the list), you’ll see a list of current microphones connected to your computer. If your microphone isn’t listen here, then it’s likely that it’s not working.
If your microphone is still not working, then your best option is to set your default recording device. To do this, open the Control Panel again and go to “Devices and Printers.” You’ll see a tab called “Default Printer,” which you can use to set the default printer for print jobs sent to your computer through the printer port.
By placing your default recording device here, you’ll ensure that all recordings are saved to the appropriate location instead of relying on whatever device was currently connected to your mic when you started recording.
Solution 5: Connect Your Bluetooth Headset Manually

When your microphone doesn’t work after you’ve installed a Windows 10 update, the most likely solution is that you’ve lost connection to your Bluetooth headset. To reconnect it, follow these steps:
- Open the Control Panel.
- Under “Sound and video,” click “Bluetooth.”
- If your Bluetooth icon is green and visible, everything works correctly. If it’s red or not visible, you must try one of the other solutions below.
- If your Bluetooth icon is not green or grayed out, there may be a problem with your headset or computer, and you’ll need to consult an expert for help resolving it.
Enable Microphone
It’s possible that your microphone is not working after you’ve updated to Windows 10. Here are a few steps that may help:
- First, make sure that your microphone is plugged in and enabled.
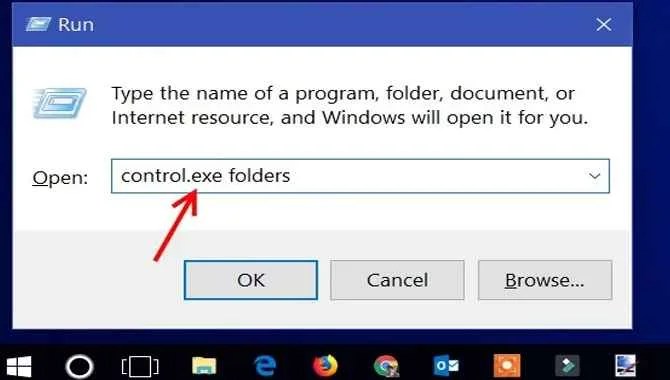
- Next, try clicking on “Control Panel” (by typing “control panel” into the Start menu or pressing “Windows key + X”).
- Under “Sound,” click on the tab that says “Microphone.”
- If your microphone is not listed under “Hardware,” you’ll need to install it.
- If your microphone is listed but not working, you’ll need to troubleshoot the issue.
Update Sound Driver
Are you experiencing problems with your microphone after installing a recent Windows 10 update? There may be a simple solution: update your sound driver.
If you’re using a built-in microphone or one connected to your computer through the audio jack, you won’t need to do anything. However, you’ll need to follow the steps below if you’re using an external microphone.
- On the Sound tab, under “Media and Audio Devices,” click on “Audio Devices.”
- Click on the “Driver” tab and select “Update Driver.”
- Select the appropriate drivers from the list and click on “Install.”
Final Thoughts
The Microphone is a mostly used and popular device. Normally it isn’t affected by Windows 10. Windows 10 update acquires new advanced features, but sometimes it may create problems after Windows 10 update.
From the above article, find what problem has occurred with your Microphone and solve it carefully. I hope now you know about how to solve microphone not working after Windows 10 update. Then enjoy a good experience with the Microphone in Windows 10.
All you need is to click on the Start button and follow the steps given in our article. Also, if your microphone doesn’t work after upgrading to Windows 10, you should try reinstalling your operating system as per the steps mentioned above.
Frequently Asked Questions:
1.Why Is My PC Having Microphone Issues?
Ans: After checking all things, such as whether it is muted off or disabled via the volume icon on the Taskbar, you may check hardware instrumental issues. If the microphone has easy software and hardware problems, you can easily repair them. But if these issues are complex, you can replace them with new ones.
2.Why Is My PC Not Detecting My Microphone?
Ans: If your PC isn’t detecting the Microphone, you should do the basic thing. When the USB Microphone isn’t connected well and turned off and disabled, your PC fails to connect the Microphone.
3.How Do I Test If My Microphone Is Working?
Ans: If you want to test if the Microphone is working, you can go to the Sound in the setting. You fix Test Your Microphone from the setting, and you can see a blue bar rising and falling when you speak and record. If you can’t see it, you can Restart or Troubleshoot your computer or laptop.
4.How Do I Reset My Microphone On Windows 10?
Ans: From the Start Menu, you can go to the Sound setting, choose Device properties, and select the Levels button. Then you can adjust between Microphone and Microphone Boost sliders to see what you want. Finally, press OK to complete the reset procedure.
5.What Are Some Common Causes For The Microphone Not Working After A Windows 10 Update?
Ans: There are a few potential reasons for the microphone not working after a Windows 10 update. Sometimes, an outdated driver can cause issues with the mic outputting audio. So If you experience this issue, it may be best to uninstall and reinstall the drivers to get them up to date.
If your computer is connect to a voice recognition service such as Cortana or Siri, those services may have disabled the microphone due to new settings being apply during updates. In some cases, malware or spyware can disable microphones on PCs through malicious programs installed without users’ knowledge or consent.
Finally, if your microphone is broken, it may not be able to function after a Windows 10 update. In that case, you will likely need to replace the mic for the audio to work correctly again.
6.Is There A Workaround For Fixing The Issue?
Ans: There is not always a workaround for fixing the issue. But some steps can be taken to try and troubleshoot the issue. So If you experience problems with the microphone after a Windows 10 update, it may be helpful to perform a system restore to revert to an earlier version of the software. This will allow you to see if any changes or updates made after your original installation have caused issues with audio output.
Additionally, consider using an external microphone instead of relying on built-in mic functionality on your computer when doing video or voice chats. This will help ensure that sound quality is improved and that any issues with the microphone are not compounded.
7.If So, How Would One Do So?
Ans: There are a variety of methods that can be used to enable or disable the built-in microphone on a computer. The easiest way to do this is likely through the Control Panel application. Once in Control Panel, look for and select ‘Hardware and Sound.’ Here, you will find different options related to sound output devices and settings for audio input devices (microphones).
Under ‘Microphone,’ you will find two heading: ‘Enable voice recognition and ‘Enable video capture.’ If you want to disable the built-in mic, you can select ‘Disable voice recognition and then click on the ‘Apply’ button.
Alternatively, suppose you want to enable it temporarily for specific tasks such as recording a video or audio clip. In that case, you can select ‘Enable video capture’ and then click on the ‘Yes,’ but be aware that this will also turn on sound input for all other applications.
8.Does This Issue Occur Only With Specific Applications Or Devices?
Ans: This issue likely occurs with applications and devices, but it may be more pronounced with specific applications or devices. If you are experiencing issues with the audio output when using a particular application or device, try switching to another application or device and see if the problem is resolved. Alternatively, you can try installing updated versions of those applications or devices.
9.Are There Any Other Symptoms Associated With This Problem?
Ans: Some users may experience sound issues when using headphones with their computers. This issue can sometimes lead to dropped connections or poor audio quality when using the microphone in video chat applications.