Do you want to Configure Microphone Settings? Here’s described in detail “How To Configure Microphone Settings.” Also, this article will show the necessary steps to set up and fix problems with your microphones. It is essential to have a good microphone to give an outstanding performance in any environment.
Whether you’re a singer, musician, or presenter, a good microphone will help you capture your voice beautifully. Moreover, it will produce the best sound possible. Microphone settings can be tricky, so it’s essential to understand them before you start filming or recording. This article will explain the different microphone settings and what they do.
We’ll also give you tips on configuring your Microphone for the best results. So if you’re starting a YouTube channel or recording a video for your website, read this guide first. A microphone is an essential part of your computer or laptop. To start with the vital function, you should configure it nicely. Microsoft allows Microphone setting quickly, and you need to properly manage and set up Microphone for better performance.
How To Configure Microphone Settings?
In windows, you can set up multiple microphones on your computer or laptop. In these microphones, one builds into your device, and the other is external. At this moment, you can configure your microphone as default. To achieve that, you should follow these actions:
First Method
Using Control Panel, you can set up your microphone, and this procedure explains below:
- Go to the Start Menu of your device and search the Control Panel. Otherwise, you press Windows + X keys and now click on the Control Panel.
- Now click on Hardware and Sound
- Then choose to Manage audio devices, which includes Sound as a submenu.
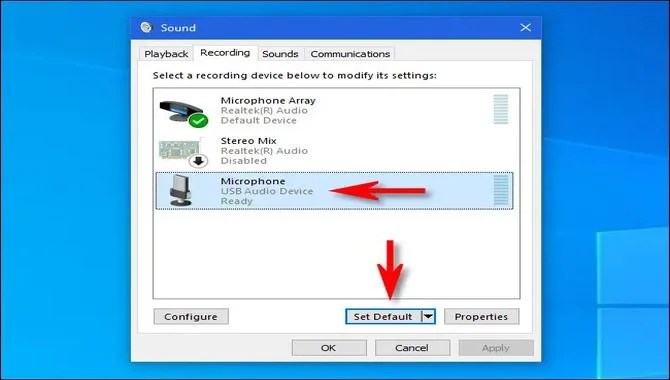
- In the header section, you can see Recording and now click on it. The green checkmark will represent that this is the default microphone.
- Select your desired microphone, press right-clicks, and select Set as Default Device options to choose another microphone as default.
- In the final step, press Ok to confirm it, and you can see that your desired microphone has a green checkmark.
Second Method
Using the Sound Setting, you can also configure it easily through Setting from Windows. This step is here:
- You find the Windows icon and press on it.
- Now scroll down the mouse and search Setting and click it.
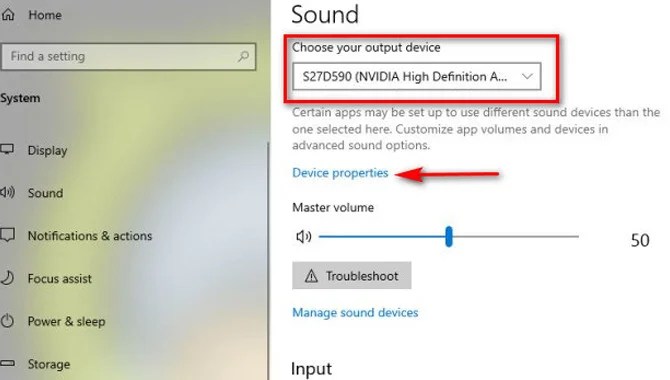
- Then choose System > Sound
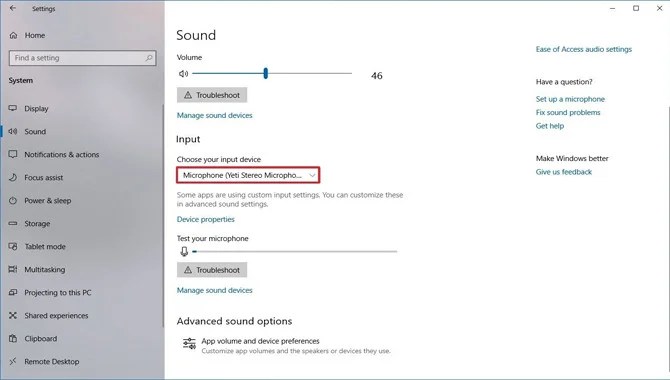
- In the final step, you will find Input and also include the dropdown button.
- So, click on the dropdown sign and choose your more preferable microphone as default.
Third Method
Using Advanced Sound Options, you can add your microphone as default and make it advance. This method is:
- Like the second step, Windows > Setting > System > Sound, you go to the Sound option.
- Then scroll down for searching Advanced sound options.
- After finding it click on it and select the desired microphone from the dropdown of Input which is wanted to set as default.
After following one of these steps, you can get your desired microphone as default.
How To Rename Your Sound Input Or Output Devices?
Although your computer or laptop has the most specific microphone name, you can change it with your understanding. There are many easy ways to change the name of the microphone. These are in below:
First Method
Using the Control Panel, you can modify the default microphone name according to your determination.
- From the Start Menu, you go to the Control Panel and open it.
- Now, you click on the Sound
- In this step, you can select the Playback or Recording option from the header of the Sound
- Then, you choose the audio tool to change the name and click on the Properties.
- Now, you write the desirable and understandable name in the box indicated above the Change Icon
- After completing this, you can click on the OK.
- Next, you can move backward to your preceding window.
Second Method
Sometimes, it isn’t clear which device is input or output. That’s why you change the output or input device or both as you wish. This method represents the rename of the output device.
- First, go to the Settings from Start Menu or use shortcut Windows + I to open it.
- Now open the system option and click on the Sound, which indicates on the left side.
- Then you choose which device name you want to change.
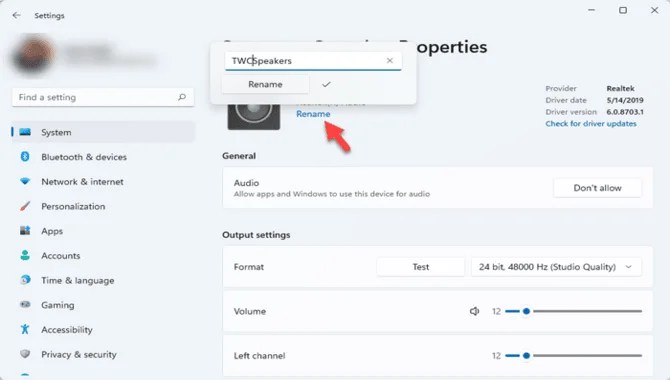
- After choosing the method, you make the name from the dropdown choice and succeed on the Device Properties.
- Presently you will notice a new window where you can observe the Rename
After following these steps, you can change the microphone name of the Input or Output device and get a user-friendly name.
How To Enable A Microphone On Windows 10

Sometimes, it may disable or turn off the Microphone, and then you can enable or turn on the internal microphone device or buy the external microphone device. Before making any decision, you should first be checking the internal section to enable it.
First Method
You can enable a microphone on Windows 10 using Device Manager.
- Go to your Winx Menu using the shortcut key Windows + X.
- You can see a list and now choose the Device Manager from it.
- Now you can click on the Sound Video and Game Controllers.
- Then click on the Audio device that installs in your device.
- You press Right Click and select Enable.
- Finally, to finish the procedure, Restart your computer.
Second Method
You can enable a microphone on Windows 10 using Windows Setting.
- Go to your Windows Setting by clicking Windows + I.
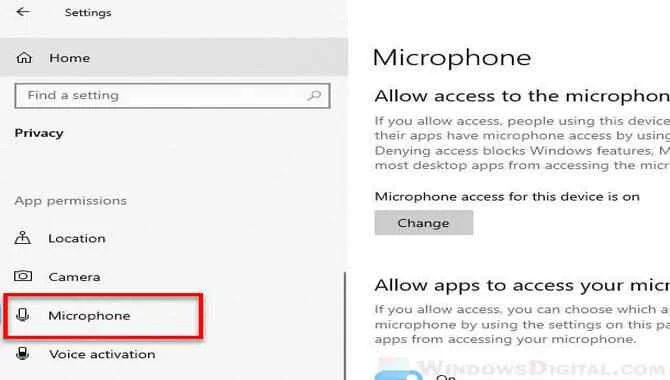
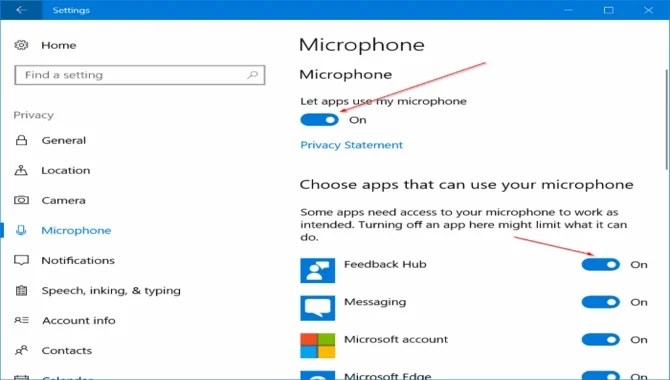
- Now open the Privacy
- You can see the Microphone option on the left side.
- Then click on the Microphone, and turn on the Let apps use my microphone
Third Method
You can enable a microphone on Windows 10 using Sound Setting.
- First, find your volume icon located into your device’s Taskbar, press right-click, and select Recording devices.
- Now select the Recording option and then press right-click on the space.
- You can see a box and click on the Show Disabled Devices.
- Then choose the Microphone that is disabled and chooses the Properties.
- Now you keep the Use this device (enable) located on the drop-down of Device Usage.
- Finally, press Apply > Ok.
How To Disable A Microphone On Windows 10
Each device consists of a built-in microphone. But sometimes, users want to disable the Microphone due to safety and other difficulties. The following steps will help you to disable the Microphone on Windows 10:
First Method
You can disable the microphone using the Device Manager.
- Press right-click on Start Menu and choose the Device Manager.
- Open this and select Audio inputs and outputs.
- Now, press right-click on the Microphone, and from these options, click on the Disable.
- Finally, for confirmation, select the Yes
Second Method
You can disable the microphone using the Setting.
- Go to Start Menu and find the Setting and click it.
- Now open the Manage sound devices and scroll down to find Input devices.
- Then click Disable of the
How To Change Microphone Volume On Windows 10

It is necessary to manage Microphone Volume to get perfect performance. An easy method gives below to change Microphone Volume:
- Go to the Taskbar of your computer or laptop and find the Volume
- Press on it and select the Open Sound setting.
- Now search Input and select Choose your Input device.
- Then select your audio device from the drop-down button.
- In this step, click the Device Properties and go to the Levels.
- Then manage the volume, which is adjustable for you but make sure that the microphone doesn’t mute.
Setting Up a Microphone
One of the first things you need to do to use your Microphone is to set up your settings. You can do this through your phone’s Settings or a third-party app like Skype.
In order to set up, you’ll need to ensure that the Microphone is on and enabled under Settings > Sound & Display > Voice Recorder.
You may also want to check whether to detect the Mic by clicking on it inside Android Device Ma are many things you can do to configure a microphone, depending on the type of Microphone and your operating system. In general, however, you will need to open the audio settings in your computer’s preferences or control panel and navigate to “sound,” then select “microphone.” Then adjust the volume and sensitivity levels.
On a Windows PC, for example, you will need to open the “Sound” app and click on the “Settings” tab. Here, you can find an audio-related performance slider that allows adjustment of microphone sensitivity.
Mac users typically have mic settings in their System Preferences under Audio > Microphone. iOS users can access the mic settings by opening the Settings app and selecting “Privacy.” Accordingly from here, you will find a toggle for “Microphone” that allows microphone sensitivity adjustment.
Skype also has a mic settings panel that allows you to enable or disable the Microphone, set its volume and sensitivity levels, and choose from one of several built-in voices. However, be aware that some microphones require specific software or firmware updates to function correctly.
Testing Your Microphone
In order to test your Microphone, you can use an online tool or a software application. Online Tools:
- Google Voice Test: This tool allows you to measure the quality of your voice-over recording using real-time feedback.
- Speech Recorder for Windows: This tool offers sound level and frequency analysis and other features to help troubleshoot issues with your microphone setup.
- Microphone Check: This online tool allows you to test the quality of your Microphone from both a distance and up close.
Software Applications:

-Reality Capture for Windows (CCW): This software application offers an automated way to measure the performance of your audio capture devices, including microphones. RECCW also provides a wide range of analysis tools and settings that can customize to help you get the most out of your voice-over recordings.
Once you have determined that your Microphone is not working correctly, there are a few things you can do to address the issue.
- Check to see if there exists any damage on your Microphone.
- After that, try different sound settings on your software application or online tool.
- Adjust the distance between your Microphone and speaker.
How To Set Microphone As Default Using Settings
On your Android device, go to Settings > Sound and display. On the screen that appears, tap on “Audio.” In the “Audio” section, scroll down until you see “Microphone” and tap on it. Under the heading “Default microphone,” select the Mic you want to be your default one. That’s it! Will now set your Microphone as the default one.
How To Rename A Microphone Using Settings
- Open the Settings app on your Device
- Under “Network & Internet,” tap on “Phone.”
- Under “Microphone,” tap on the Mic that you want to rename
- Tap the three lines in the top left corner of the screen, then select “Rename.” Type a new name for this Microphone, and press Done.
- To test your new mic name, open a VoIP app and call someone using the new Mic. In step 3, under “Microphone,” tap on the Mic you want to rename. You’ll see a list of current mics and their corresponding settings. Tap the three lines in the top left corner of this screen, then select “Rename.” Type in a new name for this Microphone and press Done.
How To Enable Or Disable A Microphone On Windows 10
- Go to Settings > Devices and expansion (or click on the ” 343 Industries” logo in the Start menu).
- Under “Microphones,” select “Front-facing microphone.” If applicable, uncheck the box next to your desired Microphone.
- Finally click OK to apply these changes, or restart your computer if prompted。
Enabling Or Disabling Microphone From Device Properties

To help or disable the Microphone on your Device, open its Properties window and look for the Audio input box. To disable the Mic, enter “false” into this box. Alternatively, you can use the Android voice commands to disable or enable Microphone:
- Talk into your phone’s Mic
- Say “microphone off” or “microphone on”
- Tap on the gear icon (three lines in a triangle) to open the Settings app
- Under “Audio & notifications,” tap on “Microphone.”
- To disable the Mic, turn off the switch next to “Enable voice recognition.”
- To enable the Mic, turn on the switch next to “Enable voice recognition.”
- To reduce noise when the Mic is disabled, turn on “Microphone boost.”
Final Thoughts
Microphones have been the best accessories for people to usher in a new era of calls. Microphone settings are different for everyone, and it is important to adjust them accordingly. Make sure you are not blaring your voice, but keep your voice’s volume in check while speaking on the phone.
Microphone settings are not that complicated. You may need basic guidelines before configuring a microphone for Skype and Hangouts calls. Follow the earlier steps and ensure your voice is clear and loud without noise interference.
FAQs :
1.How Do I Set Up My Microphone?
Ans: There are a few steps you will need to take:
- Firstly, identify the type of installed Microphone on your computer;
- After that, choose an appropriate audio output device for use with the Microphone; and
- And Finally, set up mic input levels.
Once you have completed these steps, you can use the Microphone to record audio or make phone calls.
2.How Do I Know If My Device Is Working Properly?
Ans: To test if your Device is working correctly, you can try using a microphone to record audio and play it back. If the playback sounds normal, then your Device is likely configured correctly. However, if there are any problems with the playback or recording, it may be necessary to troubleshoot the settings or replace the Mic.
3.How Do I Turn Up The Microphone Levels?
Ans: In order to increase the microphone levels, you will need to adjust either the audio output device or the mic input levels. Refer to the manufacturer’s instructions for more information.
4.What If I Can’t See The Bars Rising?
Ans: If you are using a PC, try moving the Microphone closer to the speaker or plugging it into an audio jack on the front of your computer. If you are using a Mac, try exchanging older headphones for ones with a built-in mic. If you are using a mobile device, try adjusting the volume setting.
5.How Do I Fix A Microphone Problem?
Ans: If you are having problems with the Microphone, it may be necessary to replace the Device or troubleshoot the settings.
6.How Do I Specify Which Microphone Should Be The Default?
Ans: In order to specify which Microphone should be the default, you will need to open the “Sound” preference window in your operating system. In Windows, Firstly, select “Recording” from the list of preferences and after that, choose “Microphone.” In Mac OS X, select “/Applications/Utilities/Audio MIDI Setup.” After that, click on the ‘AUDIO’ tab and make sure that ‘Default input device for audio recordings’ is set to ‘Internal Mic.
5.How Do I Change The Name Of My Microphone?
Ans: In order to change the name of you Microphone
- Firstly, open the Settings app on your Device
- Secondly, under “Network & Internet,” tap on “Phone.”
- After that, under “Microphone,” tap on the Mic that you want to rename
- And finally, tap the three lines in the top left corner of the screen, then select “Rename.” Type a new name for this Microphone, and press Done. Do you want to Configure Microphone Settings? Here’s described in detail “How To Configure Microphone Settings.”